Friday, January 29, 2010

Save Money on Tarts

I am fairly green as far as chemicals in my home go. The one thing I do like to do, however, is burn tarts in a tart burner. I can choose the scent depending on the season or my mood. But, tarts are expensive (especially if you are a Yankee Candle snob like I am-- but face it, they do smell the best).

I've learned (thanks to my sister) to save a bit of money by not buying the tarts that are specifically made for tart burners. Instead, I purchase votives (which cost as much as tarts) and cut them in half!

Photobucket

Remove the packaging and pull out the wick and the wick holder (you don't really even have to do that.. it just looks weird) and light your tea light!

Photobucket

Usually Yankee Candle has a sale on votives at least a couple times a year. I just bought up a bunch for 6 for $5 and I have votives, er, tarts for weeks!

PS- Read up here on how to easily remove the wax from your tart burner!

Thursday, January 28, 2010

Making Pizza Healthy

Yesterday I posted how I make tons of pizza dough and freeze it for future use. I thought while I'm on a pizza kick that I'd share how I make my pizza healthy.

First, I make it myself. If you control your ingredients, you control what you eat. Makes sense.

Second, I use as much whole wheat flour as I can in the crust without getting kickback from the husband and kids. Usually it's about 1:1 wheat:white.

Third, I sneak a layer of pureed vegetables on the crust before I put on the sauce. Not one single time I've done this has anyone been able to tell. I started off doing a little and when no one noticed, I kicked it up to about a quarter to a half a cup per large pizza. I always serve the pizza with fresh cut veggies, but if the kids don't eat them hahahaha they just ate carrots anyway.

Photobucket

Finally, use healthy ingredients. I usually don't put meat on my pizzas unless it's turkey pepperoni or a little ham. I personally don't like lowfat cheese because I find it rubbery, so I use full fat cheese but just less of it. There's nothing saying you shouldn't see the sauce through the pizza, and if you have lots of healthy yummy ingredients on it your family won't miss it a bit!

Wednesday, January 27, 2010

Inexpensive Pizza That's Nutritious and Delicious

Most everyone loves pizza. On any given night when I give my kids a choice "pizza" is usually the first word out of their mouth (even if that wasn't one of the options).

We live in a rural area where pizza delivery isn't an option. Even if it were, for what you get good pizza can be pretty expensive (yes, I said GOOD pizza).

I love making homemade pizza, but it takes a lot of time. So, what I've started doing is making several batches of dough at a time (which is the part that takes so long) and freezing them. Then, in the morning before I go to work I remove a frozen dough ball from the fridge and it's thawed and ready to roll out and use that evening.

Here's my recipe (this is a double recipe, for which I get about 4 good-sized dough balls):

Dissolve two packets of yeast (usually 4.5 tsp) into two cups of warm water. Add two teaspoons of sugar and stir. Allow the yeast to "bloom" or get good and foamy, usually within five minutes or so.

Photobucket

Place all that in a bowl (I use a stand mixer which makes this process infinitely easier) and add two tablespoons of kosher salt and four tablespoons of olive oil. Gradually add five cups of flour (I usually use a mixture of white and wheat), mixing as you go.

Photobucket

When all the flour is incorporated, add a sixth cup of flour gradually until the dough forms a ball and no longer sticks to the inside of the bowl.
Photobucket

Dump the ball of dough into a greased bowl, turning once. Cover with plastic wrap (or damp towel) in a warm spot and wait about an hour til it is about twice the size.

Photobucket
Photobucket

Punch the dough down and roll it out to make your pizza. Bake the pizza at 475 degrees (yes, hot) for 10 minutes or so.

Photobucket

With the dough you have left over, form it into balls and tightly wrap it with plastic wrap and drop the wrapped balls into a freezer bag. These'll stay good for a few months (but chances are you'll use them long before they go bad).
Photobucket

Thursday, January 21, 2010

Homemade bread, the hard way

In my striving to be emergency prepared, I started thinking about buying whole wheat and grinding it myself. Last year I purchased a hand grinder (cheaper and less reliant on potentially non-existent power) and found a big sack of hard red wheat berries on sale at Walmart last month. I figured it would be better to practice making bread from hand-ground wheat before I actually needed to, so I gave it a whirl. The grinding was tougher than I thought it would be, but the breadmaking was easier.

Thankfully I had a bit of help grinding the wheat (actually, the whole family took turns and it took about 20 minutes to get six cups of flour). Electric grinders can be nearly $300, so it looks like my arms may be more toned by summertime.

Photobucket

After grinding the wheat (I even threw some steel cut oats in there and made a bit of oat flour), I followed a basic wheat bread recipe. I didn't use loaf pans, so rolled it out (again with help) and made a roll out of each loaf.

Photobucket

The recipe I used made two nice loaves, which were really tasty!
Photobucket
The bread was pretty dense, as I used all wheat flour (and a little oat). For a lighter bread, next time I will use a little white flour along with the freshly ground wheat. Now I know I can make bread from scratch using freshly ground wheat, which is very satisfying. I also ground a little extra and am storing it in the freezer, and have been using it. It's a lot cheaper than buying whole wheat flour and contains a lot more bran, so I think it's better for you too.

Monday, January 18, 2010

Maximize Your Coupon Savings

I'd never really focused much on using coupons until recently. Before I would always have the coupons in an envelope or folder and sift through them through the store. Sometimes I'd find a usable one, but most times they'd expired long before I pulled them out.

So, when I decided to get serious about clipping coupons I decided I needed a better way to organize them. I went on e-bay and looked up coupon organizers, and found a style that I thought would work well for me. Then I went to my local office supply store and bought everything I needed to make my own for about $20 less than I'd have spent on e-bay. Now every week I bring my little binder with me, set it in the little compartment in the cart, open it up and leaf through it as I shop. When I find a coupon, I pull it out and stick it in a designated spot.

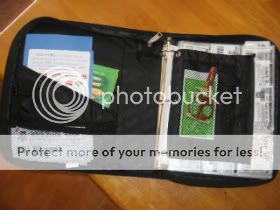
Start by purchasing a three ring binder that is enclosed in a case (being an old Trapper Keeper gal, this was sort of fun). The one I bought has a little pocket in the front, which is where I keep my grocery list.
Photobucket

Then, purchase plastic dividers that hold baseball cards. They come in packages of 9 or so and one package is enough for my needs. Some people divide their coupon books with labels (e.g., personal care, dairy, cereal) but I don't find the need to do that. I do arrange them so that I have dairy, cereal, condiments, etc but with only nine pages it's not that tough to keep track of what's where.

Photobucket

If you purchase a binder that includes little pockets, you can use these to store rebate forms, receipts, gift cards and other similar items. I carry around a small pair of scissors, a pen and a calculator (it makes it easier to tell whether you're getting a deal or not).

Photobucket

Since using this binder to organize my coupons, I use coupons a lot more frequently and usually save between 15% and 20% on my weekly grocery bill. I can also pull out ones that have expired each time I put new ones in. Although you need to invest a little cash up front, this system will pay for itself in very short order.

Friday, January 15, 2010

Homemade Play-Doh Fun

My kids love playing with Play-Doh. Frankly, I love them playing with it. It helps them be creative and is television-free entertainment (which I'm always for). While Play-Doh is not expensive, making it at home is extremely inexpensive. I can make it in tons of colors, the kids can choose their colors and I don't get frustrated if it gets left out and dries up.

Here's how I make my Play-Doh! Remember, having your kids help can be fun and is a way to involve them in the kitchen.

Photobucket

Here's the recipe:
1 cup flour
1/2 cup salt
1 Tbs cream of tartar
1 tsp alum
1 Tbs vegetable oil
1 cup water
food coloring

(Note: Alum is very bitter and is included to keep your kids from eating the dough. If your kids don't eat things like that, or if you don't care whether they do you can exclude it.)

Put all this together in a saucepan. Add as much food coloring as you need to achieve the desired color (you usually only need a few drops). Mix together and heat the mixture until it clumps and becomes a single ball. This should only take a minute or two.

PhotobucketPhotobucket

Plop the whole ball onto your countertop and gently knead it. This will help cool it down before you give it to your kids.
Photobucket

Viola! Play-Doh in about five minutes.
Photobucket

My kids' daycare provider makes play-doh for the kids and sometimes adds cinammon. The whole place smells good on those days, so adding cinammon or cloves or even essential oils may be a good way to infuse your home with good smells (or even as a type of aromatherapy) while your children are playing.

Thursday, January 14, 2010

Give your wooden spoons and knives new life

I'm finally back from the holidays (and a weird photobucket snafu) and wanted to share one of the things I did a couple weeks ago. If you own wooden spoons, knives with wooden handles or any other kitchen implement made of wood, chances are you throw it in the dishwasher from time to time. Everyday use and heat from dishwashers will eventually strip the oils from the wood making it dry and brittle and susceptible to cracking or breaking. Upon one of my favorite wooden spoons snapping in half, I was reminded that I hadn't oiled my spoons in a while. So, that's what I did!

To do this, get your hands on some mineral oil.
Photobucket
Put liberal amounts of the mineral oil on a paper towel or other rag, and rub it into your utensil.
PhotobucketPhotobucket

You can sort of see before and after with the knives below.
Photobucket

Giving your wooden kitchen implements doesn't take long, and it will extend their life. It also leaves your hands really soft!